Film Friday - September 27th, 2024. Lomography Redscale Film Review
Shooting redscale film is one of the more distinctive film photography styles to try. You can spot a redscale film image from a block away. It is also a technique that probably has existed nearly as long as color film photography but has only recently risen to the attention of more photographers with Lomography’s release of their Redscale 50-200 film. So let’s dig into this technique a bit and talk about Lomography Redscale specifically.
Redscale photography produces a spectacular and distinctive heavy red cast that can be very hit or miss, as well as gimmicky, but can also be quite interesting and fun. It all depends on how and where you choose to use some of this film.
At its most basic, the technique of shooting redscale is simply reversing the film so that the base side (the side opposite the emulsion) is now facing toward the lens. We read that this technique may originated with large format photography because it can be fairly easy to accidentally load a sheet of film with the wrong side facing out, inadvertently causing the redscale effect. More popularly, this technique got picked up by medium format and 35mm photographers who would unspool their film in the dark, flip it over and respool it, creating film loaded the wrong side out.
When photographing through film loaded in this manner, you end up exposing through the layers of the film in a reverse order. Color negative film is composed of several layers. Working from top to bottom, film emulsion is made up of a blue layer, then a green layer and finally a red layer. Below the red layer is the base of the film (which is usually orange) and then a rather opaque anti-halation layer designed to prevent stray light from passing through the film, bouncing off the pressure plate of the camera and coming back through creating a halo effect around highlights. Between each of these color layers is an appropriate filter layer which helps control what wavelengths of light continue passing on down through the emulsion. So when you turn this sandwich on its head you work through all these layers backward with the orange base and the red layer becoming the first layers of film that filter and control what light gets to the remaining layers. The end result is a photograph that is highly filtered red. But this result can be manipulated through exposure. By overexposing redscale film you allow more light to reach the green and blue layers, building up their exposure. By adding 1-2 stops of exposure you introduce more orange and yellow into your redscale images. By overexposing 5-7 stops you can largely override the red filtration and produce an image with much more yellow, green and blue in it.
In scenes with brighter skies (and more exposure) you can expect to get more yellow tones. Overexposing in general also produces images with more yellow instead of red tones.
It is worth noting that you can sort of simulate the look of redscale with much less of the effort by shooting your color film with a red filter. This will produce very monochromatic images colored merely with red tones. But this is not a perfect replacement for redscale since with that technique you are exposing through all the film layers (including that orange base) in addition to the red layer. It is also worth mentioning that different films will redscale slightly differently due to variations in emulsion design and differences in the orange base or anti-halation layer.
With that introduction out of the way though we ought to turn to Lomography’s take on redscale. Lomography’s Redscale film has been around in one form or another for over a decade now. If memory serves us correct, it was originally produced as Redscale 200 and later adopted its current Redscale XR 50-200 name (or Lomography Lobster Redscale if you are a 110 photographer). It is not clear which film Lomography is flipping over for its Redscale, and it is entirely possible the film has changed over the years and may change based on what film stocks they have available. It is also not clear if they are simply using an available film, such as Kodak Ultramax, or if they are having something custom made for them with tweaks such as Lomochrome Purple. It does seem likely that they are using a 400 ISO film, and maybe Redscale is the same stuff as Lomography Color 400 film. But this is all speculation on our part. We do feel fairly sure on the ISO 400 part since the typical redscale process requires the flipped film to be overexposed by at least 1 stop to account for light lost going through the antihalation and base layers of the film. This would be the reason that Redscale is billed as an ISO 200 film at its fastest, with the lower advertised speeds a way of introducing more overexposure and controlling the final look of the film in terms of its yellow to red balance.
We typically rate our Redscale at ISO 100 to have better shadow detail and a bit more yellow and orange tonality to our images.
While this roll was originally rated at ISO 200, the dark settings required a 1 stop underexposure, putting this shot effectively at ISO 400. It shows how Lomography Redscale gets much redder with underexposure. Image made with a Rolleiflex 2.8E2.
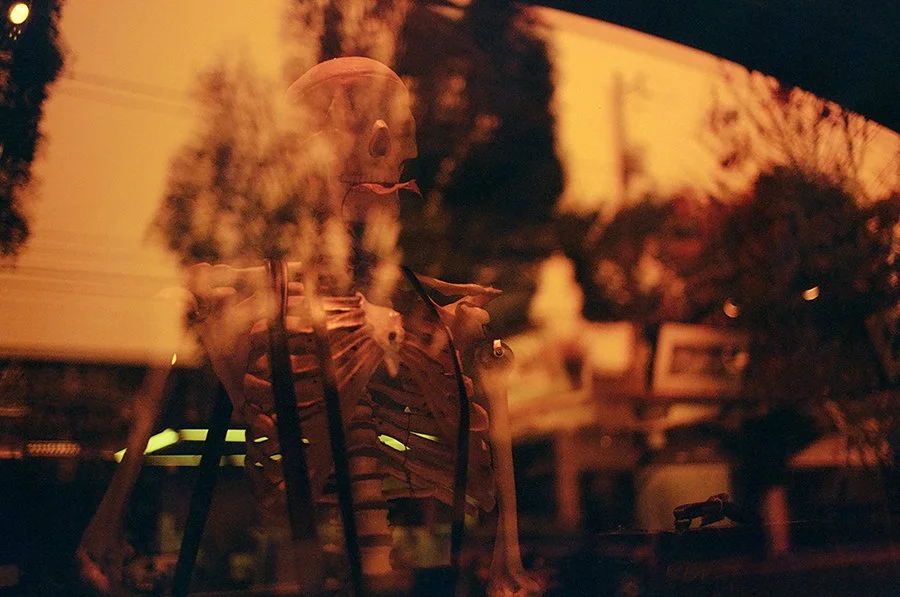
The real trick to Lomography Redscale, and redscaled film in general, is how it is put to use. It is such a strong effect that it is easy to swerve into the realm of gimmickry with it; where you rely on the look itself rather than an effective pairing between the film’s characteristics and appropriate subject matter to build an image that works well. So when and where is Redscale best used? This is quite honestly a question we are still working on fully answering. Thus far our best results have been using this film around the Halloween season. The overall vibe and themes of Halloween are rendered quite well with the creepy red tint of Redscale film. Think how often the color red is used in horror, especially to signify danger. Photographing with Redscale at Halloween may be a bit like shooting fish in a barrel, but that is just to say it is highly effective. Want to make unsettling portraits, or ominous October landscapes? Go try Redscale.
Lomography Redscale + creepy Halloween doll + fortuitous light leak for the win.
Is there a better film to photograph skeletons with than Redscale? We have not found it yet.
But we also fully acknowledge that Redscale doesn’t have to be about the creep factor. It doesn’t have to be just a Halloween film. We can see it’s effects being used to create interesting images in other ways too. After horror, our thoughts go next to sci-fi. It seems like the burnt orange apocalyptic look shows up often in various science fiction films like Blade Runner 2049 or Dune. Perhaps if used on a foggy, or overcast cityscape Redscale could turn your hometown into a strange new world.
Anyhoo, that is the gist of what we have regarding Redscale for ya! Admittedly, our relationship with this film is still maturing, but having experimented more and more with it we have found it continuously growing on us as we have begun to see past the gimmick of the film and brainstormed some ways to put it to clever, creative use.
On a related note, one of James Guerin’s new 35mm pinhole cameras is capable of exposing redscale with normal film! It has pinholes on both sides of the camera, allowing you to exposure your film naturally or via the redscale method whenever the whimsy strikes. If you want to branch out into pinhole photography and have the freedom to easily experiment with other film stocks in redscale (without the tedious conversion process) then check out the Reality So Subtle 35R pinhole camera.
We have almost every film stock available on the market. Check it out!
If you need an excellent lab for meticulous film developing, topnotch optical prints, traditional darkroom printing and superb film scanning, we’re your lab!
Also, sign up for our weekly newsletter The Loupe and keep your eyes peeled on our social media feeds every Friday when we feature a different film and also offer it at a one day discount of 15% off!
Redscale doesn’t have to be horror… it can be sci-fi as well, think Blade Runner 2049.
You can see how in this more underexposed image the film picks up a much redder cast.


