
Shooting Super 8 Today, Part III
Written by Daniel Klockenkemper

All right! You have your Super 8 camera and an idea for a cinematic masterpiece. All you need to do is pop some film into the camera and you’re ready to roll, right?
It’s all so simple until it isn’t
For the first couple decades after Super 8 came about, there weren’t a lot of choices for film. As a result, many cameras were designed around one now-discontinued film: 40-speed, tungsten-balanced Kodachrome, which was an excellent film. If your grandparents shot Super 8 film, it was probably K40, and those films are probably still as vibrant as ever in a shoebox in a closet somewhere. Almost half a century later, there are better choices for film available than ever, but not every camera was designed with the future in mind.
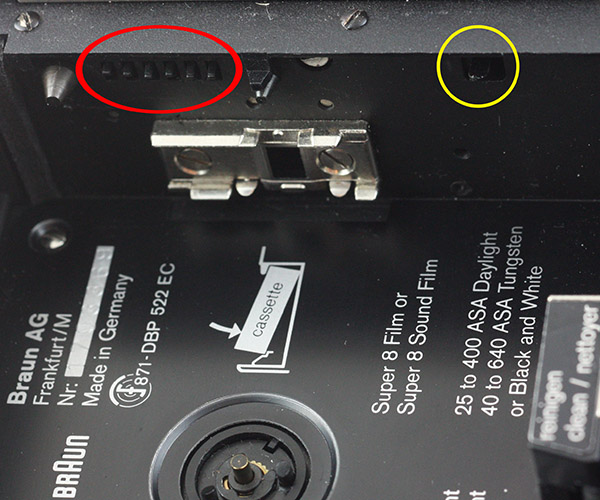
The six film speed switches in this camera, circled in red, will detect a wide range of film speeds. The color balance switch is circled in yellow.
The switches above the gate detect the film speed based on the size of the notch on a Super 8 cartridge. The number of switches and how close they are together determines what film speeds a camera will recognize. Some cameras have a lever instead of switches, and the range the lever can travel corresponds to a range of film speeds. But how do you know which switch equals which film speed?
If you’re lucky, this information will be printed on the camera somewhere, usually inside the film chamber like in the picture above. It may be listed in the manual – you might find it online if it didn’t come with your camera. There could also be specifications for your camera online on a site such as the Super 8 Wiki.
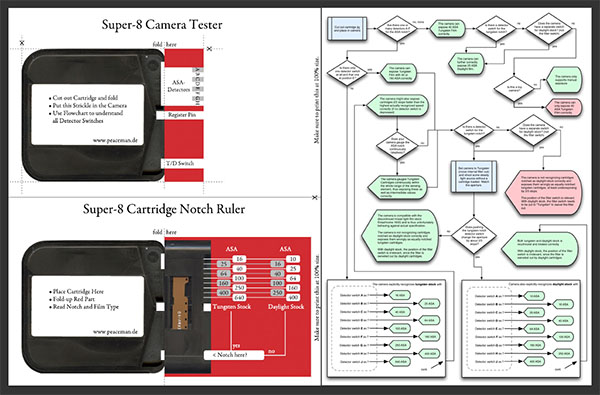
http://www.peaceman.de/blog/index.php/super-8-notch-ruler-new-and-improved
If all else fails, someone else has thankfully figured it out already. If you can’t find any information, then download, print out, and cut out the measuring sheet above, and use the flowchart to deduce the camera’s specifications. The flowchart might appear brain-melting at first glance, but remember that you’ll only have to go through that process once for each camera you own.

About that bulb switch
If you’re scratching your head about daylight film and tungsten balance, this section is important. The Super 8 specification was designed to handle color balance in a simple, straightforward manner, but not all cameras implemented it fully. Here’s how it’s supposed to work:
Color film is designed to render a certain wavelength of light to look “white.” To most movie film, household light bulbs with tungsten filaments – the kind that give off warm, orange light – look white, hence “tungsten-balanced.” If tungsten film is shot outside in sunlight, the sunlight looks cold and blue; daylight needs to go through an orange filter before it hits the film to look normal.
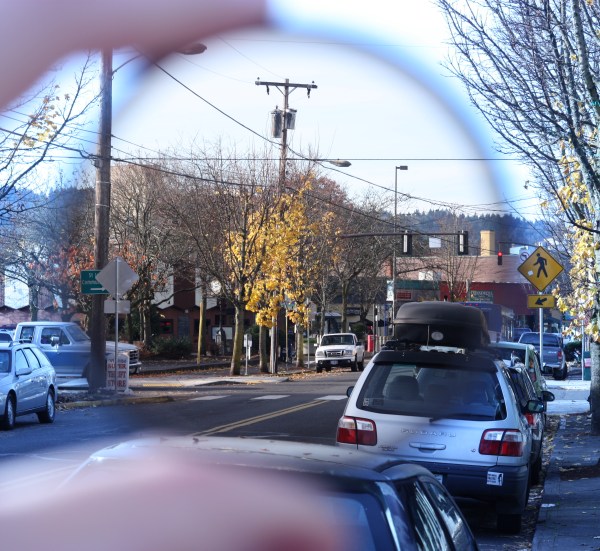
This example shows the effect of an 85 filter when shooting tungsten balance in daylight.
Most Super 8 cameras have the orange filter built in. The particular, standardized color of orange is called Wratten #85. Tungsten-balanced Super 8 cartridges will have a notch near the bottom to tell the camera to use that 85 filter. The camera doesn’t know when it’s inside or outside, though, so there’s usually a switch on the side to override it. (Some cameras have a “filter key” which is inserted into a slot in lieu of a switch.)
With tungsten-balanced film in the camera, put the switch in the “sunny” position to engage the 85 filter. The other position on the switch should look like a light bulb, which disengages the filter for filming indoors – if you leave the orange filter on under tungsten light, everything will look too orange.
Daylight film cartridges don’t have the notch that tungsten-balanced ones do. When you insert a daylight film cartridge, the cartridge should push a switch inside the camera to automatically disengage the 85 filter, regardless of the position of the bulb switch. Outdoor sunlight looks correct to daylight film; tungsten light will appear warm and orange, much like tungsten film would if the 85 filter was used indoors.

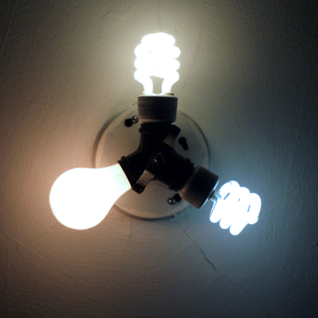
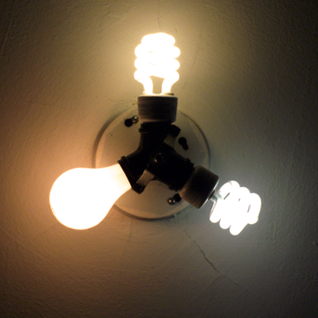
Above: Three light bulbs of different color temperatures. The tungsten bulb is on the left; the “daylight” bulb is on the right.
The bulb on top has an in-between color temperature, and this picture is balanced for the in-between bulb
to illustrate the difference between tungsten and daylight.
Below: The same image, as it would appear using tungsten-balanced film (left) or daylight-balanced film (right).
Super 8 cameras are supposed to automatically compensate for the position of the filter in order to correctly expose the film. Unfortunately, this isn’t the case for every camera. The mix of film types available over the years has resulted in some cameras that don’t behave correctly with the films we have today. If you downloaded and followed the flowchart above, you should be able to figure out how well your camera sticks to the specification.
If your camera doesn’t handle color balance quite right, you still might be able to make things work. Instead of using the built-in 85 filter, you could use an accessory 85 filter in front of the lens, leaving the camera always switched to the light bulb. This is sometimes a good idea anyway – internal 85 filters can sometimes be faded or dirty after years of use, and you’ll always know when you’re using the 85 filter because the viewfinder will be orange.
Which film should you actually use?
Within the limits of camera compatibility, choose the film that is most suited to the conditions in which you’re filming. In bright light, use low-speed film; if you’ll be indoors or in low light, use faster film.
Kodak deserves major credit not just for keeping Super 8 film available, but also for offering their most up-to-date motion picture film stocks in this small-gauge format. At the time of this writing, there are four film stocks available – one black-and-white reversal film, one color reversal film, and two color negative films. (Update 16 April 2019: With the reintroduction of Kodak Ektachrome 100D there are now five Super 8 films available from Kodak: Tri-X, the aforementioned 100D, Vision 3 50D, Vision 3 200T and Vision 3 500T.)
Reversal Film
Reversal film – you may know it as slide film – offers the most direct, economical Super 8 experience. After your film is shot and developed, you can thread it into a Super 8 projector and watch the same physical film you ran through the camera, with no additional steps necessary. There’s nothing to stop you from transferring reversal films to video if you wish, though.
Since reversal films have less exposure leeway than negative films, they’re also useful to test if your camera is exposing properly. Kodak currently offers just one black and white reversal film:

Kodak TRI-X Black & White Reversal Film 7266
ISO 200 (daylight) / 160 (tungsten)
TRI-X Reversal Film 7266 is a high-speed, panchromatic black-and-white film. Provides rich blacks and excellent contrast… suitable for general interior photography with artificial light.
Kodak Ektachrome 100D Color Reversal Film 7294
ISO 100 (Daylight) / 25 (tungsten, with 80A filter)
In 2018, Eastman Kodak reintroduced Kodak Ektachrome 100D to the market after it had been out of production for several years. It features modest color saturation while keeping neutral gray tones and excellent skin tones.
Color Negative Films
Negative films offer higher speeds and far greater exposure leeway than reversal films, but these benefits come at a cost: the Super 8 negative films are more expensive, and you cannot project the film after it’s developed. The only practical option after shooting is to transfer the film to video, which is an additional expense. When transferred to video, however, negative films offer much more flexibility to adjust the image than reversal films.

KODAK VISION3 50D Color Negative Film 7203
ISO 50 (daylight) / 12 (tungsten, with 80A filter)
VISION3 50D is a low speed daylight-balanced film offering the world’s finest grain to ensure a pristine, clean image that is full of color and detail.
![Kodak VISION3 200T Color Negative Film 7213ISO 200 (tungsten) / 125 (daylight, with 85 filter)VISION3 200T is a 200-speed tungsten film that provides the image structure of a 100-speed film… [It] performs superbly in both controlled interiors and in…](https://images.squarespace-cdn.com/content/v1/5a6a6f7d7131a5be62e9e3db/1519252422438-AH621YESQZ6HHNAVHFPI/Vision3_200T_Super8_box.jpg)
Kodak VISION3 200T Color Negative Film 7213
ISO 200 (tungsten) / 125 (daylight, with 85 filter)
VISION3 200T is a 200-speed tungsten film that provides the image structure of a 100-speed film… [It] performs superbly in both controlled interiors and in challenging high-contrast exteriors.
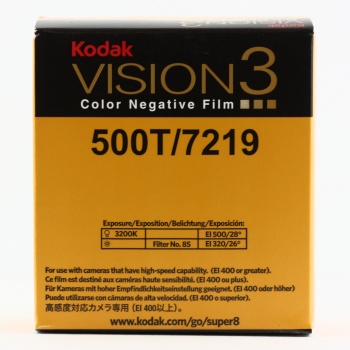
Kodak VISION3 500T Color Negative Film 7219
ISO 500 (tungsten) / 320 (daylight, with 85 filter)
VISION3 500T gives you noticeably reduced grain in shadows, so you can push the boundaries of exposure further and still get excellent results… What’s more, VISION3 500T Film’s extended highlight latitude gives you greater flexibility when lighting extreme situations, and lets you pull even more detail out of highlights.